A new obsession is growing. Of course, I’m just over the hump of the last obsession (pinned pretties) and still hungry to make more pieces like the ones in last weeks post, but I’m driven to try new things to keep the creative juices flowing. My love of enamels is still going strong. I love adding color to metal. It makes something that might otherwise seem ordinary POP and I’m popping like Jiffy Pop in the studio right now! There’s a reference there that only folks from my generation are likely to get. :::nod to my older homies::: Anyway, what’s all the excitement about you wonder? Organic enameled bangles, that’s what. I’ve only made a couple so far because I have a lot of orders on the bench (not a complaint!) and I’m torn between being a good girl and cranking out those orders and being a bad girl and following the path my Muse is laying out before me. She never wants to do the stuff I’m supposed to be doing, naughty girl. It’s all play, play, play and who needs to pay the bills and feed the kids? I do, dear Muse… But she is relentless so I had struck a bargain with her: I must accomplish some of the must do stuff and in between I will reward myself with a play break to do the wanna-do-fun-stuff. So here are the results of my ‘play breaks’ over the last couple of days.
A good bit of labor goes into these babies. Of course, I’m learning now so the going is slow and I’m sure I’ll get faster with time, but some things just can’t be rushed. First of all, there are no short cuts in cutting these babies out. For smaller pieces, like rings, I can order them pre-cut to the width I want and then only have to cut the length, but with these bangles being 8″ in length that’s impossible. Even the metal suppliers don’t have bench shears that will cut something eight inches long apparently, so I have to cut them by hand with a jewelers saw. Dear God, how I hate sawing. But saw, I must. I had to start with a 18″ x 6″ sheet of copper. My bench pin is only about 5 inches long (a tool used to brace metals while you’re cutting so they’re not wobbling all over the place making it nearly impossible to complete the objective) so it was almost no help in the process. I had to cut the 18″x6″ into 8″ x 6″ pieces, then divide each piece into as many bangles as I could get out of it, marking my cut lines with a sharpie – and of course I couldn’t find my fine point sharpie. UGH. It makes better lines to follow with the saw blade.

Here I’ve cut the sheet down to 6″x8″ already and now I’m cutting the fist bangle blank out.
After cutting out the blank, there’s filing, making sure my ends are flush to solder (solder doesn’t fill gaps – and gaps are the kiss of death in this project). Just the cutting, sanding and filing takes a good amount of work. Once this is done, I can move on to soldering.

And now, soldering.
After the soldering is complete, there’s a good deal more sanding and filing. I have to remove extra solder from both sides of the bangle. I also want to make sure that the edges are nice and smooth so that the bangle will be comfortable (and not scratchy!) to wear when it’s complete. I love sanding and filing as much as I love sawing…

I have my bangle, cut, filed, sanded and soldered so now the real fun can begin! Next I hammer and form to change the character of the bangle. I really like the organic look that these bangles take. My first bangle took me three hours or so and it didn’t even have the cool embellishments! I wanted a ‘LOOK AT ME’ color on the first one, so I chose bitter green. It’s a favorite for me anyway as I’m a green girl so that had a lot to do with my choice. I kept the first bangle simple.

First enameled bangle
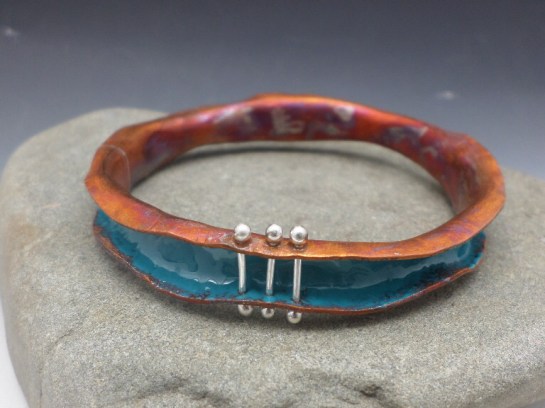
It’s not exactly what I was going for, but overall, I like it. It was enough to make me want to continue and make more. So on my next play break I made one in turquoise and this time I added some pinned embellishments. I also tried flame painting the inside of the bangle. I couldn’t get the colors the same on both sides. On one side it came out more pinky, blue and on the other side it came out more bronzy. I really liked the bronzy look as I thought it make the turquoise pop. The green one has bright, clean copper finish on the inside. The next one I plan to oxidize. What do you think about my turquoise?

First, here it is with the bright, clean copper finish.

Now a close up of the pinned embellishments.

Now, here’s the bangle with the flame painted finish.
I’m diggin’ it! How about you?
I’m planning on making a third one to complete a full stack in my favorite color combo; Turquoise, bitter green and marigold. Alas, I must get more ‘must do’ stuff done before I’m allowed to take a play break again. Meanwhile, here’s a picture of the two I’ve completed on… I think they look even cooler stacked. Can’t wait to see these two with the marigold!

Stacked!

Now, back to work with me. I have orders to get to the post office and orders to produce. If I’m really good and get enough done to reward myself with a play break, I’ll be sharing a new marigold one soon. I have different ideas for embellishments on that one. No telling… you’ll just have to wait and see!
Eventually, these will be available for sale in my etsy shop! So if you love them and can’t live without them, hang tight!

Just beautiful Delia!
Thank you Maureen! 🙂