Changes to Celebrate!

The New Year has brought a lot of changes into my life. With those changes came a move – and a new working space. I have to say that it’s quite an improvement over my ‘garage studio.’   I’m SO excited about my new space! It’s no longer a corner in my garage, which was piled high with every other imaginable kind of household storage items, but a space completely dedicated to me and my trade. It’s a dream come true!

happy me

I was eager to share some pictures with you of my new space, though it’s still a little disorganized (to say the least) so please overlook the mess. I had to start working well before it was even 20% unpacked, which made it a little difficult to unpack in an orderly fashion. I had orders pending and had to get things moving as fast as possible, which was a challenge considering that the move was both home and studio and during school for my three kiddos. Here are a few pics of my half unpacked, chaotic-but-coming-together space. The first bench is my main bench where I solder, fire cloisonné, etc. The bench behind it is my metals bench, where my jewelry press, rolling mill and shaping and forming tools for metal are kept.

main and metals

Under the boxes on the right-hand side were the 2 x 6’s and the 4 x 4’s that my new bench ‘Thor’ were to be built with. What a sturdy bench he would be too!

working end

When it was completed, we dubbed it Thor because it was one awesome, sturdy kick-butt bench! Better yet, the bench was built by hands that love me! A long time friend (now much more than a friend) Stephen, my best friend Jennifer and my beloved son Dakota all chipped in to bring Thor to life!

jen and koka

koka drilling

trio bench

And the final result of their efforts – Thor brought to life!

thor

One end of my new studio is working space, and the other end is for storage and casual space which at this time tends to be play space for my daughters, Hailey and Rhiannon, who frequently spend time with me in the studio while I’m working.

girls fun end

There have been a lot of changes in my life, and all of them are cause to celebrate!

steve and i

Rainy Day Sale 20% to 50% off of in my Etsy Shops

Well, it’s been a happy but rainy holiday season here … and while the holidays have passed the rain hasn’t. Given that I’ve been sick and am just a few inches this side of ‘well’ I opted to stay home this morning instead of setting up at Palafox Market. That’s two weeks in a row I’ve missed. 😦 I don’t like missing the market. I miss my artist friends as well as all of my lovely customers. I decided to go ahead and run a sale in my Etsy shops. The sale runs now through Monday, January 5th.

If you love jewelry, check out my primary Etsy shop and take 20% off of your entire purchase using code RainyDay15 at checkout. This is a great way to get some fabu Delia Stone jewelry at a fantastic price! You know you want to! Check it out: DeliasStones on Etsy

beach 2014

But if you’re the kind of girl who loves to MAKE her own jewelry, then slide over to my Tutorial Shop and take 50% off of any and all tutorials available. You’ll never get a better deal than THAT on these tuts, so if you’ve been wanting on now is the best time to take the leap! New skills for the new year! 🙂 Tutorialshop on Etsy

il_570xN_299909410

Take advantage of the sale! Pop in now so you don’t forget! Happy New Year to all!

10 Things You Should Never Say to an Artist – or Should You?

I found this meme running around on Facebook today and I read over it. As I understood it, this list of questions is supposed to be offensive to artists but I found that most of these questions don’t offend me as an artist at all and I thought I’d take a little time to share my thoughts. First I’ll present the list and then address them below.

10 questions not to ask an artist

I’m going to address the questions in the order they are listed in the meme, starting with number 10.

10) “l’ll just get my friend to make me one of those.”

Well, let’s face it. That one’s just rude. There’s no way to make this one a positive thing. Just acknowledge that such a remark says far more about the individual than it does you or your work. Try not to take it personally – we all know there’s some really classless people in the world with no filter. They’re the ones you move on from and don’t waste your time with. They’ve just announced to you that they’re not your customer after all.

9) “You know what you should make?”

I actually like number nine. I’ve gotten a lot of great ideas from customers. I always listen to the customer’s suggestion and thank them for offering it. Of course there are many suggestions that I don’t use, but a few have been very helpful and inspiring. Some suggestions are ideas that I’ve already had – sometimes I say so, sometimes I don’t. If I say so I make sure to say it in a positive way that reaffirms that I think the customer had a great idea. I’m certain these people don’t mean to be offensive in any way. They were just inspired by something they saw on your table, thought they had a great idea and shared it with you. It’s valuable feedback from your customer, they’re telling you what they want. Thank you for your suggestions! That’s my attitude.

8) “Do I get a price break if I buy two?”

I understand that a good many artists are offended by this. I am not. I usually have some kind of special in my booth to direct them to if they’re looking for a sale. For example, I often offer a buy two get one free earring sale. This works well for me. I’ve had someone who only intended to buy one pair of earrings buy two – doubling my sales. I’ve had someone buy two lower priced earrings and decide to splurge on themselves to get a pair of luxury higher end earrings. Since the lowest priced one is the free pair this is good for me too as again it’s taken the sale up a notch for me and made the customer feel good about splurging on themselves at the same time. Win/win. Also in the above scenario the redirection is better than saying no. While it’s not always possible I try to avoid using negative language that ends a conversation. ‘No’ is certainly one of the most definitive enders in the English language.

7) “I can make that myself.”

Again, people who do not possess filters are everywhere. See number 10 above.

6) “Why does it cost so much?”

I am most comfortable when I’m in the studio working or when I have the opportunity to talk about my art with an interested party. While I find talking about the money the most uncomfortable part of my job I do not shy away from this question. I use it as an opportunity to tell a little bit of my story and tell them exactly how much work and skill has gone into the piece. Sometimes I talk about what inspired individual elements which gives me the opportunity to engage them fully in the details of the piece. This one hasn’t happened very often. Only twice that I recall. But I didn’t get offended, I took it as a sign they were really interested in the piece. Both conversations resulted in making the sale – at full price.

5) “How do you make this?”

I LOVE question number five. I love to tell people about the techniques I use. Not only that but I see this is a green light. The customer just gave me permission to try to sell them. I especially love telling people about my cloisonné work. I even keep a small sign on my table with pictures of various stages of a cloisonne piece in progress to provide a visual aid as I describe my technique. I try to use descriptive words that allow them to visualize me working on the piece in my studio – a little window into the life of the artist. This can be a very effective selling tool. A lot of serious buyers are often sold on the artist’s story and the story or inspiration behind the piece before they’re actually sold on the piece.

4) “Can you donate your art to our event? We can’t pay you but it will be great exposure.”

I donate my work to charities often. Not so much for the exposure (because I’ve never really had a sale result from a donation that I know of) but because I like to feel like I’m giving back and contributing to my community. However sometimes the sheer volume of donation requests an artist gets can be overwhelming. I can’t accommodate every request but I do give careful consideration to each request and the cause. Just in case you’re one of the people out there who works to gather donations, please understand that this kind of request is made all of the time of us artists and while I am happy to give I have to draw the line somewhere. If I don’t donate to your cause this time, check back with me next year. However, also know that if I donate to your cause and find myself immediately contacted by two other people seeking donations for other events who tell me that you gave them my information right behind my donation to you I will feel like I’m being pimped out and strike you off of my list next year. Don’t pass my name around on the ‘sucker’ list. Trust me when I say I am already inundated with a multitude of donation requests. Realize that just because I gave to your cause doesn’t mean I’m a bottomless well of free jewelry. I’m an independent artist who is trying to support three children and maintain a home. Don’t abuse my generosity.

3) “My nine year old makes this stuff too.”

I’ve never had anyone compare my work to their nine year olds craft. Rather, in my experience, this question usually goes something like this: ‘My (insert relative) makes this kind of stuff too.’ Now in this case, I do want to distinguish myself and my work from your niece’s hobby so I have to address this. I am going to remind you politely that I’m a professional. I usually respond something like “Really? That’s great! What galleries does your niece show in?’ (thanks for that one Bruce Baker!)  In this way I have responded in a positive manner and managed to distinguished myself as a professional all at once. Of course, on occasion you’ll find that her niece is also a professional. Keep the dialog positive and know that your customer is probably just proud of her niece and wanting to brag on her as any good auntie would.

2) “Kids, this is what happens when you don’t go to college.”

Okay, so we all know that’s not intended to be a compliment – but take it as one anyway. It’s either that or you accept the poison stinger the wasp just extended. I just respond exuberantly “That’s right! You get to earn a living being creative and doing what you love instead of being stuck in an office or a job you hate.” And by the way Mrs. Wasp, you shouldn’t assume that an artist hasn’t been to college. Some of us may be better educated than you! I know brilliant engineers, scientist and technological innovators who are artists.

1) “I can buy that at Walmart for $3.99”

If you’ve ever said this to an artist you really should be ashamed. The fact that someone doesn’t know that already tells me a great deal about the individual. The first thing you should take away from such a remark is that this person just announced to you that they are not your customer. Thank you for the heads up! That’s what you should be thinking. Move on and don’t waste your time on them. As I said before, there are a lot of classless people in the world without filters. Yes, some ARE actually out to get a rise out of you – and that’s exactly why you shouldn’t let that happen. Don’t reward and reinforce the negative behavior in any way. Sometimes they just want attention and this is their way of trying to get it. I rob these individuals of the attention they seek by leaving them to be their own audience.

In the end, I suppose what I want other artists to take away from this is that ALMOST all questions are good questions. Most can be used as a tool to engage your customer further, to humanize yourself to them, to tell them your story and ultimately to make the sale. The term ‘green light question’ was coined by Bruce Baker. He defines it as any question that gives the artist the go ahead to begin to sell the customer on your work. As Bruce Baker says, it’s important to recognize the green light questions and act on them. I also think it’s important to recognize that a yellow light question is an opportunity to turn it around into green light question and close the sale and possibly build a relationship with a soon to be repeat customer.

https://www.etsy.com/shop/deliasstones clois beach bracelet lp 4

Torch Fired Cloisonne Workshop September 14th

Here’s your chance to catch the Torch Fired Cloisonné Enamel workshop again. It’s been a couple of months and I’ve had endless inquiries as to when the next one will be. Well it’s this Sunday boys and girls! Sorry for the late notice. September has flown with school back in, Soccer practice for two kids, and so much custom work my head is still spinning! You MUST reserve your spot for this class in advance as seats are limited, so please! If you’re all in – contact Patty at Danish Princess Beads and Jewelry in Milton, FL right away. See below for more information.

mermaids dance

Learn the art of torch fired cloisonné enameling with Delia Stone. In this one day intensive you will learn how to counter enamel, create and layout a design in fine silver to create a collection of cells, ‘paint’ or apply color and torch fire using an inexpensive handheld torch as well as grinding back the stone. Settings are not covered in this class. It is focused solely on making the cloisonné jewels for use in your own settings.

trio clois jewels

Date: 9/14/2014 Sunday Time: 12:00 – 5:00
Location: Danish Princess Beads and Jewelry in Milton, FL (850) 490-0310
Instructor Fee: $125
Note: Contact Patty at Danish Princess for a list of tools and supplies necessary.

Delia Stone’s Studio Labor Day Sale! 20% off for jewelry and 50% off for Tutorials!

To celebrate Labor Day I’m offering a 20% off sale to all of my loyal customers, readers and followers to thank you all for making it possible to live my dream. 🙂 You make cyberspace a warm and friendly place. You put food on my table and help me to provide for my family. You encourage me and add fuel to my creative fires! How can I not take the opportunity to show you some love? 🙂

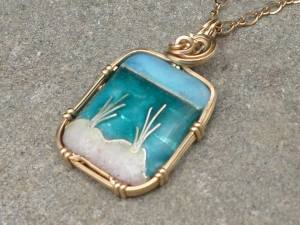
In my Delia Stone’s Studio shop on etsy, you can use code LaborDay14 at checkout to take 20% off of any purchase. Why settle for just one? Christmas is just around the corner and the more you buy the more you save (says the evil sales lady :::wicked laughter:::). Check out my new Cloisonné mini beach scene pendants. You can get them at a steal for this deal. $67 to $75!

mini gld 1

Follow this link to take advantage of the sale on finished jewelry: https://www.etsy.com/shop/deliasstones?ref=l2-shopheader-name

If you make your own jewelry, you might be more interested in my Tutorialshop sale on Etsy. You can take 50% off of any purchase by using the same code at checkout: LaborDay14.

il_570xN_299909410

Follow this link to take advantage of the sale on tutorials: https://www.etsy.com/shop/TutorialShop?ref=si_shop

Thanks for your patronage and kind encouragement over the years! Wishing you and your family a safe and fun filled weekend together!

labour_day_004

A Look Back and Marking Progress

I recently found myself revisiting an old post, Fabulous Fire and the Quantum Karp,and it gave me cause to reflect. The post was made fairly early on in my cloisonné experiments back in April of 2013. I realized as I read that I had posed something of a question to myself. I wrote ” I cannot wait to see what my efforts over the next year will yield if I remain steadfast in my enameling experiments.” And so now, here I am, just over a year into my foray into enamels. So how far have I come? I decided that it deserved review.

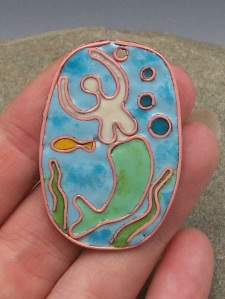
My first cloisonné piece was a mermaid. Why I chose a mermaid I couldn’t say. I really was not a mermaid fan. Didn’t like them, didn’t dislike them, I could take them or leave them. However, over the past year through my enameling, I have become something of a nut for mermaids. My first one wasn’t pretty, but she had BIG boobs! She didn’t have hair. Why? Because I was afraid to try to add hair. I didn’t think I could do it. Keep in mind, I was terrified I wasn’t going to be able to make a successful cloisonné piece to begin with! I just didn’t have the nerve to take on hair too. Have I mentioned that I’m faint of heart? I felt I was being brave enough just going all Hail Mary on a cloisonné experiment I was sure was doomed to begin with, so I just moved past the whole daunting hair issue. I created the design with some scrap 20 gauge copper wire I had laying around. Rough around the edges to be sure. Some people couldn’t even tell she was a mermaid. I was still proud of her. She represented my foray into brave new territory, my pride in being able to move past my fear (no matter how loud that little voice in my head screamed ‘you can’t do this!’) and discover what I COULD do rather than fretting over what I didn’t think I could do.  This piece was completed in March of 2013.
mermaid

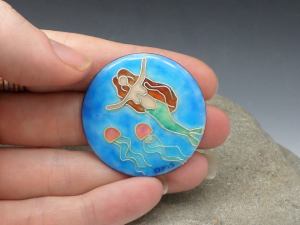
So how far have I come? Pretty far, I think. My latest mermaid even has hair. Yes. I found my courage for that too eventually. 🙂 See for yourself.
mermaid and jellyfish

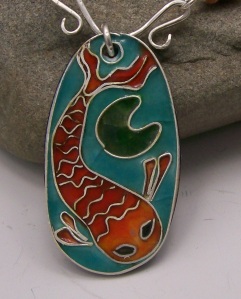
Another one of my early pieces that I was proud of was the Quantum Karp.  I called him the quantum Karp because I felt that I had taken something of a quantum leap in my cloisonné when I went from my bald, big boobed mermaid to this little guy.  I was thrilled with how he turned out.  Note that I had a cloisonné wire frame on him as well (just as in the first mermaid). Why?  Because I was ever so foolishly afraid the glass would run off of the edges.  I laugh about that now, but at the time I was quite concerned. lol
koi

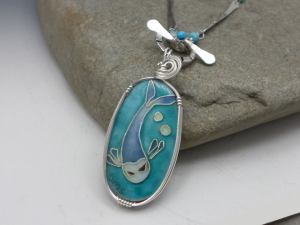
Of course eventually I came around and realized that the glass would not run off of the surface.  So to measure progress I share my blue fish. Have my fish evolved?  I’m not sure about this one (outside of the fact that the blue fish doesn’t have signs of my silly drippy glass phobia).  The truth is that I like them both. My blue fish has less detail in the actual design, but my color shading is certainly better, whereas it was nearly nonexistent in my Koi.  What do you think?
blue fish 6

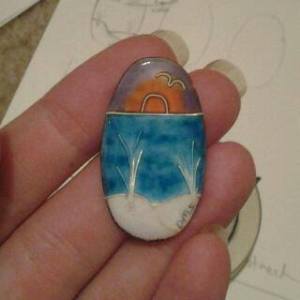
As for my beach scenes have come a loooong way.  I’m sure you will agree.  I look back at my first one and it looks so clumsy, so … I dunno.  Ugly is the word I think I’d use.  I look at the orange and purple sky, and the blue water, and they two simply aren’t in unison.  It’s as if there is a sunset skyline paired with high noon waters.  It just doesn’t work for me.

beach1


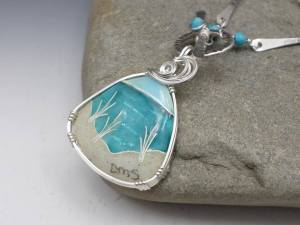
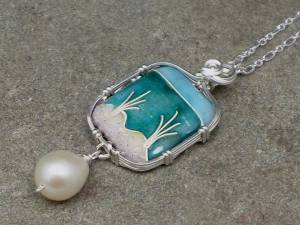
I do, however, love my beach scenes in present day.  Not only are they far more pleasing to the eye, I’ve added little slivers of silver foil in the beryl blue waters to mimic movement in the waves and best yet – real beach sand from the gulf coast fired into the sand dunes.  Progress is apparent here, in my humble opinion.beach 2014

And so, with the year in review I ask myself ‘what will my work look like in 2015?  Will I progress?  Will I look back at the pieces I am so proud of now and think again how far I’ve come?  The only answer I have for that is ‘I certainly hope so’.

___________________________________________________

Get you own mini cloisonné ‘Peace of the Beach’.  Now available in my etsy shop: https://www.etsy.com/listing/198904667/beach-scene-cloisonne-enamel-necklace?ref=listing-0

beach mini 2

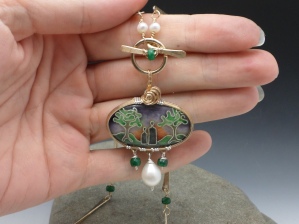
See what else I’ve been up to.  Are you a tree fan?  I am, and they’re beginning to appear in my cloisonné. https://www.etsy.com/listing/198884770/sunset-valley-handmade-cloisonne?ref=listing-1
SAMSUNG CAMERA PICTURES

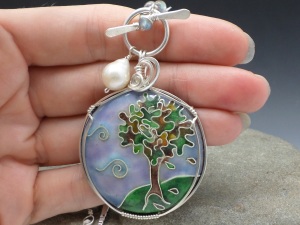
https://www.etsy.com/listing/197894888/handmade-cloisonne-autumn-winds-necklace?ref=listing-3

SAMSUNG CAMERA PICTURES

The Creation of a Crabby Ring

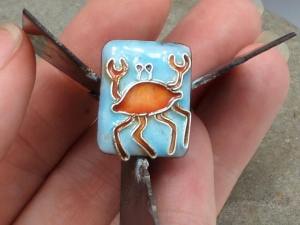
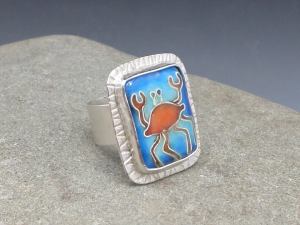
I thought I’d share some pictures of my most recent custom order. Do you remember my first Crabby ring? I do, and I soooo loved him. When I was at a show I would repeatedly pick him up to admire him. He had so much character I couldn’t resist. And then a few minutes later I would go to check on him only to have panic strike my heart when I couldn’t find him – and then I’d realize that I had unconsciously put him on my own finger instead of back in his spot. I would have to force myself to put him back on display … and then, he sold! I have missed him every day since then. I recently received a custom order for another Crabby ring. I took a few pics along the way (trust me when I say the pictures display a much abbreviated version of the process) to share with Kelly who commissioned him and thought I’d share them here with everyone. I couldn’t find the initial pics, but they begin here with his fourth firing (after counter enamel, base coat and the firing which secured the wires in place). When it was ready for me to begin laying color down, I started with his body and his tiny eyes.

krabring1

After a couple of rounds on the body and eyes, I began to lay down the first coat of the light blue.

krabring2

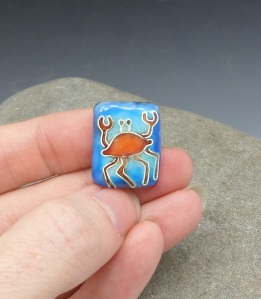
Here’s a picture of him after a few rounds of the light and then darker blues, along with a little more orange-red for the body. I used my stone to grind him back to a flush surface and shape the edges for a smooth bezel.

SAMSUNG CAMERA PICTURES

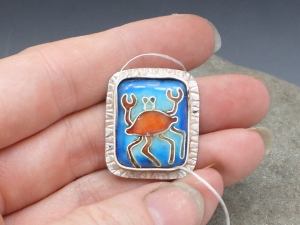
Here are the components (less the ring shank) before soldering. The base, the bezel wire (already soldered) and the jewel itself. In my first attempt to solder the bezel to the base, I melted the fine silver bezel wire. ARRRGGHHH! Frustrating. So then I had to deconstruct and reconstruct the setting with a new bezel wire. Finally, the setting was ready. Now all I had left to do was solder the ring shank to the setting. First, I tested the fit of the jewel in the final setting. The dental floss is put behind the jewel before I pop it in to test the fit so that if you have a good fit (the stone/jewel sometimes doesn’t want to come out – and I still had to solder the ring shank on) and I had a very good fit. So tight, in fact, that I actually broke the dental floss when I tried to pull the jewel out. That resulted in about another 40 minutes of fiddling to successfully extract the jewel so I could move on to the next step. I didn’t think it was going to cooperate for a little while there …

krabbyB

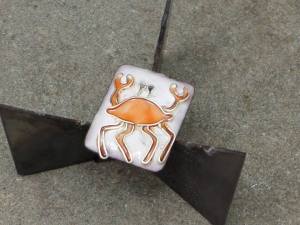
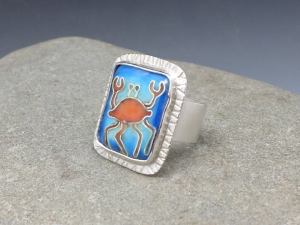
And the final ring, shank included.

Krabby3

krabby2

I adore him! Okay, no bias there, right? LOL What do you think of my little Crabby ring? 🙂

Would you like a custom piece all your own? Then check out my shop on Etsy! https://www.etsy.com/shop/deliasstones

New Adventures in Metal Clay

I’ve always wanted to dabble in metal clay. I have also always wanted a kiln to fire it in. Recently, the kiln fairy dropped into my life and dangled a brand new Evenheat Kingpin88 kiln – never fired – for half price. I couldn’t afford NOT to take advantage of this opportunity. I had the kiln for about a month and a half before I ever fired it. I guess you could say I was a bit intimidated by the whole thing – different firing temps, schedules, and scary electrical stuff. Okay, it’s a standard household plug in so that shouldn’t have scared me but I can be faint of heart sometimes. So I read, and I read some more and I researched, and I researched some more. I watched videos and read articles and digested – until I found myself forced to take a weekend off from my regular Palafox Market schedule when Jay went out of town and I was left with three kids. There’s not enough valium in the world for me to take a four year old, a seven year old and an 11 year old to the market with me and the luxury of a babysitter is rare indeed for us – So I decided to make it my weekend to brave the new frontier of metal clay. No more excuses!

kiln

For my first experiment with the kiln, I decided to do something simple and something a little more complex. I used PMC Plus fine silver metal clay and cork clay to make a hollow form heart bead using a Sherry Haab tutorial. I also made some simple molded pieces – tiny sand dollars, a seashell and a starfish. I imagine them being incorporated into a metalworked setting for one of my cloisonné beach scene jewels one day. Here’s a picture of the pieces in the kiln. You’ll have to forgive the poor photo quality as I was taking pics with my cell phone through the process for the sake of convenience.

inside the kiln

And then, the adventure began! Time to ramp it up (<–look at me, using the 'lingo'). First, I had to stop and read the manual so I could figure out how to program the firing schedule in. I was sure the whole time that I'd screw something up, but I didn't! Never let fear stop you, acknowledge it and move past it anyway (even if it takes you a month and a half!). After all the right settings were entered I pushed the enter button for the final time, holding my breath, and the display began to show the temperature rising. Oh joy! I was on my way. It was very exciting! Because I was so excited I took a picture of it ramping up to temp.

ramping up

And then, the moment of truth! Did they sinter properly? Did they overheat? Perish the thought! My efforts were met with reasonable success. The picture below shows the pieces I fired. When they emerge they have a pickle white residue on the outside. That’s pickle as in what silver looks like after it emerges from the acid used to remove the black firescale that develops when it’s torched, referred to as ‘pickle’ – not a kosher dill. 😉 To make the piece shiny again you have to brush it with a brass or steel brush. In the picture I left one sand dollar unbrushed, and the left side of the heart unbrushed so you could see the difference.

brushed v unbrushed

sea ornaments

While the seam on the right side of the heart did fine, I ended up with a small hairline on the left side that looks like a crack, though it didn’t go all the way through. The good news is that this is an easy repair. All I have to do is fill the seam with more clay and refire it. The booger is that the chocolate diamond I set in the center of the heart clouded up in the firing, so it’s not as sparkly as I would have liked. There’s no fix for that to my knowledge.

heart right

heart left

But the fun didn’t end there. I also had some Fastfyre Bronze Clay to play with, and some great lazer printed rolling mill designs to work with. I imprinted a large peacock feather and two smaller ones for earrings. Here’s a picture of them drying before firing.

broze prefire

And here they are post firing and after a good brushing with the brass brush. You can see that the bronze has a nice golden color.

bronze post fire

To make the metal even shinier, you can use a burnishing tool – which I did. I also added a bit of a patina to reveal the details of the delicate peacock feather. I really liked the bronze this way.

bronze polished

Eager to see the piece as finished jewelry, I just added a pearl bail and put it on a gold fill chain. I loved it – and it sold off of the facebook post I made. That was a gratifying feeling – to have sold one of my first pieces so quickly! Thanks for your support Jennifer!

bronze necklace

I used the little molded ammonites to make the cutest pair of earrings. I REALLY liked these. Something about the turquoise and the bronze together really pleases my eye.

earrings

As soon as I got my molding compound I made some sea urchin molds and promptly turned them into simple necklaces as well. I love the sputnik sea urchin (with the dark pearl). Such an interesting pattern. I really wanted to do more with the sputnik – and may yet, but for now it’s a simple necklace.

sputnik necklace

urchin neck

Suffice it to say that I had great fun with my kiln and finally having conquered my fear I predict that this could be easily addictive as cloisonné enameling has been for me. If you follow my blog you’ve seen how THAT obsession consumed me. The adventure with metal clay has just begun. I’m sure to share more of the journey with you over the months to come.

I also want to remind you that my Rainy Day Sales ends at midnight on Monday. When you make a purchase in my Etsy jewelry shop DeliasStones today through Monday, you can use coupon code RAINYDAY to take 15% off of your total purchase. If you prefer to make your own jewelry, you can take 50% off of any tutorial purchase in my Tutorialshop through Monday as well using the same coupon code. I hope you take advantage of the sale. Have a great week ahead!

Rainy Day Sale in Delia’s Etsy Shop 15% & 50% OFF!

earrings

On Saturday’s I am usually selling my jewelry at our local Farmers Market, Palafox Market. It’s become a wonderful market not only for our local farmers but for our local artists as well. Nothing has done more to bring our local artists together as a community and to give us a means for making a living doing what we love. I planned to be there today but we were rained out and though a few brave artists weren’t dissuaded by the rain I certainly was. I hope my fellow artists who braved the rain were able to make a few sales today for their efforts. I opted to stay home and work on orders instead. This does give me a great excuse for a rainy day sale, however, so I decided to go for it. I don’t do this very often, so if you’ve had your eye on a piece you’d like to own this weekend is a good opportunity to get a great deal!

When you make a purchase in my Etsy jewelry shop DeliasStones today through Monday, you can use coupon code RAINYDAY to take 15% off of your total purchase. If you prefer to make your own jewelry, you can take 50% off of any tutorial purchase in my Tutorialshop through Monday as well using the same coupon code. Have a great weekend, and if yours is rainy too, I hope you find a pleasurable way to spend it!

Again! Stackable Rings Workshop: An Introduction to the Basics of Soldering

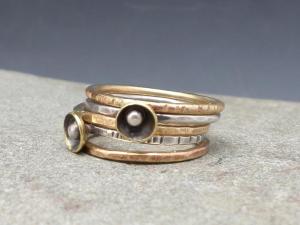
My last workshop for stackable rings was so popular it over flowed with sign ups, so much so that we decided to go ahead and schedule another class for this month. Keep in mind that this class is already 75% full due to the overflow of the last class, so don’t dilly-dally about signing up. Claim your seat today by calling Patty at Danish Princess Beads and Jewelry at (850) 490-0310.

This is the perfect workshop for the aspiring jeweler who is ready to venture into the world of metalsmithing. This four hour workshop will introduce you to the basics of soldering which will open up a whole new world of design possibilities for you. In the workshop you learn a variety of skills designed to lead you into the world of metalsmithing.

r mixed stack 1

R flower stack 1

Techniques Covered in this Class:
Using a torch
Cutting and filing metal in preparation for soldering
Annealing metal
Soldering metal
Stretching a ring band
Adding textures
using a flex shaft
adding embellishments

Be sure to reserve your seat because this is a class that is going to fill up FAST! Seats are limited and already going quickly.